07 October 2008

Octopus and Fennel Salad


I'm quite certain that for several reasons, some are already looking a bit sideways at this recipe. If you believe it's too "slimy" - you actually handle it very little before it goes into the pot. If you've had octopus in the past that's a rubbery mess - this dish is cooked long and slow resulting in a very tender meat. This is a dish we did at Petersham Nurseries Cafe and was one of my favorites. It's a wonderfully simple and tasty dish...stay with me on this one.

Serves 3-4

Ingredients
Knob of butter
1 tbsp sunflower oil
2 heads of fennel, cut into large dice
1 red onion, cut into large dice
1 head of garlic, cut across the center
1 bunch of marjoram
14 oz / 400 g tomatoes (tinned or fresh), peeled and roughly chopped
1 whole octopus, best if frozen
1 bottle of full-bodied red wine, 1 glass kept back for the cook
2 heads of fennel, very thinly sliced
2 tbsp marjoram leaves, finely chopped

Over a low heat, sweat the diced fennel, red onion and garlic in a knob of butter and oil in a deep saucepan until softened. Add the tomatoes and marjoram until the tomatoes break down. Defrost, clean and rinse the octopus. Cut the head from the body, keeping the body intact. Find the mouth in the center of the body, cut round the mouth and remove. Add the octopus and red wine and place an upturned plate on top of the octopus to keep it submerged. Bring to the boil and then simmer until tender, 2-2 1/2 hours. In testing doneness, the octopus is ready when it comes away without resistance when running a skewer through.

Remove the octopus to a dish and keep warm. Ladle a bit of the stock into a small saucepan and reduce to a desired consistency, adding butter or cream to thicken the sauce very slightly. When making the sauce, do so to personal preference. It is not necessary to thicken the sauce too much, as it is already quite a rich dish.

Slice the remaining fennel very thinly on a mandoline. Cut the body and tentacles into randomly-shaped 1-inch pieces, while cutting the head into thin slices. Build up the dish in alternating layers of sliced fennel and octopus. Garnish with the sauce, freshly chopped marjoram and a drizzle of nice olive oil. Close your eyes if need be, but be ready to be pleasantly surprised.
John Conroy


Things to remember
Freezing tenderizes the octopus, which will also cut down on the cooking time. Choose an octopus that is quite large, as it will "shrink" during cooking.

Fennel can be a very strong flavor for some, but slicing it thinly softens the flavor a bit.

06 October 2008

The beauty of pork


At Ballymaloe, a few other students and I had become quite interested in the sections of the course in which we learned about butchery. Whether it was pork, lamb, beef or game, it was very satisfying as we learned how to be economical in using all of the animal.

So when the chance to buy and butcher an organically-raised pig came round, clearly we jumped at it. Aside from miscommunication on the financial costs involved, it turned out to be one of my best days at Ballymaloe. Ten hours after collecting our two whole pig halves, literally head to tail, we had broken the pig down into spare ribs, chops, ham, pork belly, rashers, several cuts of roasts, loin, 11 kg of sausage and the cheeks which we cold smoked. We had several community dinners through which we barely made a dent to rid our freezers of a year's worth of pork. It remains the most flavorful pork I have ever eaten.

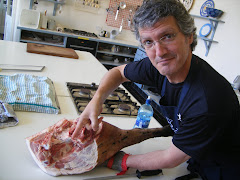
Nonetheless, it was such a brilliant experience that I have since obligated myself to buy a half pig with a friend and butcher it ourselves...all in a domestic kitchen. I'm quite certain that experience will find itself noted on this blog at some point. It also piqued my interest in the various processes of curing meat, specifically pork. Since returning to the States, I decided to become more aware of this process by going to Des Moines, Iowa and working a couple days at La Quercia. They are noted as the premier producers of American Prosciutto, supplying loads of top chefs and restaurants throughout the States.

The owners, Herb and Kathy Eckhouse, were great hosts as they allowed me to work with their staff for two days and learn a bit about curing pork. Obtaining their meat from suppliers who use humane methods, La Quercia follows a seasonal view of taking the pork through the various stages of salting, resting and drying. Albeit on a very basic level, I was able to get involved in several phases to include removing the salt and femur, trimming and washing the salt from the legs, and getting coppa readied for it's resting stage.

It's hard work with a lot of care and concern taken at every step. It's so easy for months of hard work to go pear-shaped with a lack of attention to detail. I certainly came away with a better understanding of the huge effort involved and how delicate a process it really is. For anyone working closely with food, I surely recommend getting stuck in and really finding out about where your food comes from and how it's produced. You can't help but appreciate what it takes to turn out not just decent food, but food that's considered to be the best.

30 September 2008

Sweet Scones

Being American, I didn't grow up eating scones. My first exposure to scones was in England, put off by numerous examples of dry, tasteless and rock-heavy travesties. At Ballymaloe, making scones was part of our introduction to breads. It may have been that I was quite lucky but my first go at scones turned out fairly well. And to my surprise they weren't anything like the ones I had in England. Light, sweet and so full of flavor - you gotta love butter - they didn't even need jam or cream. These are sweeter than most, so you may prefer to scale back on the sugar as most people have them with jam. There aren't many things more comforting than a really lovely scone.

Makes 18

Ingredients
2 lb / 900 g plain flour
6 oz / 180 g unsalted butter; chilled, cut into 1/2 inch cubes
3 whole eggs
2 oz / 60 g caster sugar
3 heaped tsp baking powder
15 fl oz / 440 ml milk
egg wash
granulated sugar

Preheat oven to 250C / 480F. In as large a bowl you have, sieve all dry ingredients together. Add the butter and using a light hand, mix the butter and dry ingredients until it resembles course breadcrumbs. In a separate bowl, lightly whisk the eggs then adding the milk to mix well. Make a well in the center of the dry ingredients and add the egg/millk mixture, keeping back about 2 oz / 60 ml, bringing it to a soft dough. The dough should be of a consistency that it will just hold it's shape when cutting into rounds. Turn out onto the very lightly floured counter and gently roll out to about 1/2 inch thickness. Use a 2 or 3 inch round, dipping it into a small bowl of flour between cutting to keep it from tearing the dough. Bring any remaining dough together and roll once more to a thickness of 1/2 inch. The scones made at this point will be just a bit heavier, the more the dough is worked. So again, keep a light hand. Brush the tops with egg wash and dip into a plate of granulated sugar. Keep space between the scones on a baking tin and bake 10-15 minutes on the middle rack. A good indication of doneness is when the scones easily slide from the bottom of the tin. They're best eaten just a few minutes from the oven. Although they will keep in the fridge for ages if they taste of a cereal box.
Darina Allen


Things to remember
A key aspect of light and fluffy scones is coarse breadcrumbs...not fine as in some recipes. The coarser and larger bits of butter leave behind larger pockets of air as the butter melts into the scone, leaving you with a handful of heaven. Do experiment a bit and see what you prefer.

I tend to whisk eggs or egg whites on their own before adding any other ingredients as this breaks down the albumen (the stringy, gooey bit) in the whites.

It's best to keep back some liquid when initially adding to dry ingredients. As the weather changes, so does the amount of humidity and thus the amount of moisture in the flour. So there are times when you may need a bit more or a bit less of the liquid specified. As with all pastry and doughs, you'll develop a feel for the texture that you want. This is an aspect of baking where there is some wiggle-room.

29 September 2008

Petersham Nurseries Cafe


After finishing three months of cooking school at Ballymaloe in Cork, Ireland, I went to London to gain some practical experience in a restaurant kitchen. It took a bit of time with numerous phone calls and emails, but I eventually found myself at Petersham Nurseries Cafe. It's the one place I had in mind amongst all the top London restaurants and I was very lucky to have the chance to work with head chef, Skye Gyngell.

There are a number of things I remember that Skye had said to me. The first, which I won't forget, was that the kitchen porters were the two most important people in the kitchen. It set the tone of how she treated her staff and the value she placed on the people with whom she worked. Although she was admittedly "consistently inconsistent", Skye continually stressed flavor and the absolute importance of proper seasoning. A significant aspect of the restaurant was the ingredients - unbelievable produce, that was the best of the best. As extensive garnish didn't enter into her cooking, seasoning was even more critical to the final dish, allowing the ingredients to taste of themselves and without disguise. Strict adherance to seasonality and freshness made each day dynamic and creative. The menu would change weekly and then again in bits and pieces during the course of the week. There was such a feeling of curiosity and expectation during the 30-minute walk along the Thames then through a cow pasture - yes, this was in London - that I couldn't wait to get there. A unique woman, Skye offered constant challenges and from whom I learned loads.

It was an incredible experience and I owe much of that to the people there. In the kitchen, Tito, Mikey, Lughan, John, Suze, Kenny, Emma, Clare, Jo and Roz were a group of people that gave me so much in terms of helping me learn and taking the time to ensure I got it. Out front and in the cafe were Jo, Jess, Isabella, Jessica, Laura, Millie, and Francesca who would meet up with me at the desserts area and nibble through extra bits of cheese or cake and take a moment to talk about how the day's been going so far. And then the kitchen porters, Pedro, Ishey and Maurizio were always steady and there to lend a hand. I just happened to land amongst these good people and I couldn't have done any better if I had picked the place and people myself. I'm thankful for but a few things, and I put my time in London in that crowd. Even though I got endless crap about my voice and accent..."desserts!" and "datterini" will never be the same.

It was at times very difficult being away from my wife for such a long period of time. But making such a unique career change needed me to go out and get equally unique experience. Over the next couple years I'll see how my time at Petersham has influenced my career. Yes, it's all quite new and there's still a huge degree of anticipation and excitement to things at the moment. But it doesn't feel like "work" or a "career". It's the same now as it was when I made the decision to do this almost 2 years ago...I wake up with thoughts of being in the kitchen, tasting, learning, having fun, being creative and sharing the joy of it all with someone else. Life really is grand.

28 September 2008

Ginger Ice Cream

At Ballymaloe, I started adding an occasional ice cream as an extra dish on my prep list. Ice creams were fun and allowed me to play around a bit. Although we did a variety of dishes each day, making ice cream gave me the chance for a small bit of creativity. And really, who could resist ice cream on a beautiful Spring day in Ireland? Actually, it's hard to resist on a cloudy day, in my mind. At any rate, this goes well as a balance to various Asian dishes.

Serves 4

Ingredients
350 ml / 12 fl oz milk
2 tsp ground ginger, powdered (4 tsp fresh ginger)
5 large egg yolks
125 g / 4.5 oz granulated sugar
300 ml / 10 fl oz cream
2-3 pieces of stem ginger, finely chopped

Over a medium heat, add the ground ginger to the milk and bring to just under a boil. Gently simmer for 5 minutes. Remove from the heat, cover with a tea towel and leave to cool for about 20 minutes. In the last 5 minutes of cooling the milk, whisk the egg yolks. After about 2 minutes, allowing the yolks to mix well, slowly add the sugar. Continue whisking until the mixture is pale and nearly doubled. Strain the milk and fold into the egg/sugar mixture, so as not to cook the eggs. Return to the mixture to a low heat and cook until it thickens enough to hold a line when running your finger over the back of a spoon. When cooled, stir in the cream and transfer to an ice cream machine. Add the stem ginger about halfway through the churning.


Things to remember
Powdered ginger will be twice as strong as fresh, hence twice the amount of fresh. Regarding sweetness and adding flavors, both will diminish somewhat during freezing, so add just a bit more on the front end. After a couple goes, you'll get to know the amount of flavoring to add.

By covering the infused milk with a tea towel instead of a lid protects it from developing a skin and reducing, while allowing it to cool.

Whisking the eggs and sugar until it doubles in volume gives additional creaminess to the ice cream.

"Folding" in the warm milk will help keep the consistency of the egg/sugar mixture. There are other methods of combining warm milk and eggs. It's a matter of trying each method, finding the texture you want in the end. Consider the flavor and whether the texture should be a bit creamier (chocolate) or a bit lighter (lemongrass). This is part of the fun...honest.

Adding the stem ginger halfway into the churning ensures it will be evenly dispersed throughout. Otherwise, if added before it's thick enough, the ginger will sink to the bottom.

Yoghurt

My wife's homemade breakfasts aside, yoghurt with honey is probably my favorite breakfast. Of course, the honey must be Irish. Ahh, enjoy the morning.

Makes 2.5 pints / 1180 mls

Ingredients
4 pints / 1900 mls milk
1/2 pint / 240 mls double cream (heavy whipping cream)
9 fl oz / 270 mls live plain yoghurt

Over a medium heat, bring the milk just to the boil, then very gently simmer to avoid scorching the milk. Allow it to reduce by a third. Transfer it to an earthenware bowl, add cream and set aside to cool. When it's cool enough to leave your finger in the milk/cream mixture until the count of 10 (mississippis, not alligators), add the yoghurt. Cover with cling film and leave in a warm place overnight or until set. The consistency should be spoonable, certainly not watered down. If you wish to add fruit, I'd recommend doing so after it has set. It will keep in the fridge for about a week.
Darina Allen


Things to remember
The reason the milk is boiled is to reduce and develop a concentrated/thicker consistency. More importantly, it "cleans" the milk of it's resident bacteria and allows the yoghurt's bacteria to take over.

The yoghurt can be normal store bought, but it does need to indicate the word "live" somewhere on the label. And yes, it does matter the type of yoghurt you use - garbage ingredients going in, results in garbage on your spoon. Your choice.

Using an earthenware bowl is preferable to keeping the mixture in the saucepan, as it prevents the acid in the yoghurt from reacting with the metal saucepan.

"A warm place" you ask? A normal and stable room temperature often works, but I have also covered it with a towel to help the process along a bit.

Although you may find yourself wanting to finish the whole bowl of yoghurt, do remember to set aside enough to continue the process for your next batch.

First things first

I've considered writing about food and after a bit of prodding, I'm finally getting on with it. I plan to give a few recipes and ideas on dishes and some occasional and random thoughts on food. It'll hopefully be good fun...

The recipes are based in either grams/millilitres or ounces/fluid ounces. I'll try to list the converted measure for each, just know the second (converted) measure will be approximate. Personally, I prefer to use grams and millilitres, as they are more accurate. Although, with the exception of baking, most recipes do not necessarily call for such accuracy. So, this makes it easier for me to tweak a recipe.

Keep in mind recipes really are just a guide...the interpretation of a recipe will be as diverse as each person who cooks. I'd suggest you don't blindly follow the recipes, but instead follow your own taste as you become more familiar and comfortable with the ingredients. Before you start cooking, read through the whole recipe. As we go along, all this will become very clear.

When the recipes aren't my own, I'll list the source. It's just shite not to.

Oh yeah, remember this: Butter - good. Salt - good. Some of you may be hesitant about this, but they add and allow flavor to develop. As with most things in life, cooking is all about balance. There is a place for both.

Most importantly, enjoy yourself and the comfort of food...