Focaccia may very well be one of the most versatile breads. It is also one of the easiest to make well. I came across focaccia - focaccia that had a thin, crispy crust with a remarkably light crumb - ages ago when I lived in Italy. Although much more moist than a pizza crust, they do share some similarities. As there are far less toppings, they are usually quite strong in aroma and flavor which helps balance the bread. The difference is that focaccia is all about the dough with toppings held to a minimum. It is important to remember the beauty of this bread rests in its simplicity.
I learned the basics of making focaccia at school in Ballymaloe. But my understanding of focaccia specifically, and bread in general, became more refined with a few weekend mornings spent at Ballymaloe House Hotel. I would help Scott, the Head Baker, make a variety of breads and desserts for both the lunch and dinner services. He showed me tips that made the difference between an edible, yet decent bread or dessert and one which truly sets itself apart from anything else around. Rolling a bread before it goes into the loaf tin to concentrate the rising; folding in flour by hand instead of adding it into a mixer when making a cake, to minimize working the gluten; and to make an exceptional focaccia it requires time and patience...such attention to these often overlooked details is of the sort that start to bring this into the realm of craft. Scott also worked during his time off making artisinal breads and selling them locally. It was exciting and inspiring working with someone who was confident to create a unique niche in such a hugely food-aware region. I think this was the moment in which I realized that food done really well could be the avenue into doing something quite special.
As my wife is absolutely crazy about good bread, I'm sure I'll be kept fairly busy trying to make the perfect crust...well maybe not perfect, but we'll have fun getting close.
Makes 2, 1lb loaves
Ingredients
1.5 lbs / 680 g strong white flour, preferably stone-ground
2/3 oz / 20 g fresh yeast or half the amount of dried yeast
2 level tsp kosher salt
1/2 oz / 15 g granulated sugar
2-4 tbsp olive oil
3/4 pint / 430 ml lukewarm water
Varied toppings such as sundried tomatoes, fresh herbs or marinated olives, all to personal preference
A few pinches of quality sea salt, preferably Maldon
Mix the sugar and yeast in 1/4 pint / 150 ml of the lukewarm water and leave until both are dissolved. Add olive oil to the 150 ml of water. Sieve the flour and salt into a wide bowl, make a well in the center and pour in the 150 ml of water and most of the remaining lukewarm water, keeping a bit back. Bring the mixture together into a dough that can be kneaded.
Turn the dough out onto a lightly floured counter, cover and leave it to relax for 10 minutes. Knead until the dough is smooth and springy, about 10 minutes by hand. Set the dough into a bowl and cover with cling film and allow to double in size, usually 2 hours at room temperature. If you plan on making the focaccia the next day, place it in the fridge as it will slow down the rising process. When doubled, reach underneath the dough and lifting it out of the bowl, allow it to drape over your arm. The weight of the dough itself releases air, thus knocking itself back. Tuck the edges of the dough underneath itself and shape into a tight ball. Place back into the bowl, cover and again allow it to rise for another 30-45 minutes. Repeat this knocking back another 3 times and leave to relax 10 minutes...yes, both you and the dough.
Split the dough and place in the center of a lightly oiled baking sheet (about 16 x 20 in). Brush a couple tablespoons of olive oil over the dough and sprinkle over a pinch of sea salt. Using the tips of your fingers and starting in the center of the dough, shape and extend the dough by very lightly dimpling the surface. Loosely cover with cling film and rest for 20-30 minutes. Do this several times, one pass at a time, until the dough is roughly 1 in / 2.5 cm thick.
Preheat the oven to 450 F / 230 C. If you want to include any toppings, lay them out over the surface of the dough. Do not put any herbs on now as they'll burn, waiting instead until the last 10 minutes of baking to do so. Add a last bit of Maldon, bake for 5 minutes and then turn the oven down to 400 F / 200 C and bake for a further 15-20 minutes. Allow to cool slightly before serving...che bella!
Tim Allen
Things to remember
If unable to find strong white flour, all-purpose flour will suffice.
As opposed to the usual heavy-handed method of knocking back by literally punching the air from the dough, draping it over your arm is also more respectful and incorporates a bit more air into the dough. Some recipes call for shaping the dough into it's final state all in one go after knocking it back once. Gently knocking back the dough several times as well as patiently shaping the dough over the course of a couple hours helps the dough retain as much air as possible. Yes, this is one of those key tips which makes this focaccia better than most.
To test the difference for yourself, I'd recommend splitting the dough and making one loaf in the manner described above and a second loaf by knocking it back once, resting 10 minutes and shaping it once. Making really good bread is about trial and error...believe me, I've made 5 lb monsters and others which have turned out light and flavorful enough to eat on their own. Trying to make consistently good bread is the challenge and quite satisfying when it happens.
19 October 2008
07 October 2008
Octopus and Fennel Salad

I'm quite certain that for several reasons, some are already looking a bit sideways at this recipe. If you believe it's too "slimy" - you actually handle it very little before it goes into the pot. If you've had octopus in the past that's a rubbery mess - this dish is cooked long and slow resulting in a very tender meat. This is a dish we did at Petersham Nurseries Cafe and was one of my favorites. It's a wonderfully simple and tasty dish...stay with me on this one.
Serves 3-4
Ingredients
Knob of butter
1 tbsp sunflower oil
2 heads of fennel, cut into large dice
1 red onion, cut into large dice
1 head of garlic, cut across the center
1 bunch of marjoram
14 oz / 400 g tomatoes (tinned or fresh), peeled and roughly chopped
1 whole octopus, best if frozen
1 bottle of full-bodied red wine, 1 glass kept back for the cook
2 heads of fennel, very thinly sliced
2 tbsp marjoram leaves, finely chopped
Over a low heat, sweat the diced fennel, red onion and garlic in a knob of butter and oil in a deep saucepan until softened. Add the tomatoes and marjoram until the tomatoes break down. Defrost, clean and rinse the octopus. Cut the head from the body, keeping the body intact. Find the mouth in the center of the body, cut round the mouth and remove. Add the octopus and red wine and place an upturned plate on top of the octopus to keep it submerged. Bring to the boil and then simmer until tender, 2-2 1/2 hours. In testing doneness, the octopus is ready when it comes away without resistance when running a skewer through.
Remove the octopus to a dish and keep warm. Ladle a bit of the stock into a small saucepan and reduce to a desired consistency, adding butter or cream to thicken the sauce very slightly. When making the sauce, do so to personal preference. It is not necessary to thicken the sauce too much, as it is already quite a rich dish.
Slice the remaining fennel very thinly on a mandoline. Cut the body and tentacles into randomly-shaped 1-inch pieces, while cutting the head into thin slices. Build up the dish in alternating layers of sliced fennel and octopus. Garnish with the sauce, freshly chopped marjoram and a drizzle of nice olive oil. Close your eyes if need be, but be ready to be pleasantly surprised.
John Conroy
Things to remember
Freezing tenderizes the octopus, which will also cut down on the cooking time. Choose an octopus that is quite large, as it will "shrink" during cooking.
Fennel can be a very strong flavor for some, but slicing it thinly softens the flavor a bit.
06 October 2008
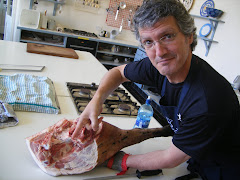
The beauty of pork

At Ballymaloe, a few other students and I had become quite interested in the sections of the course in which we learned about butchery. Whether it was pork, lamb, beef or game, it was very satisfying as we learned how to be economical in using all of the animal.
So when the chance to buy and butcher an organically-raised pig came round, clearly we jumped at it. Aside from miscommunication on the financial costs involved, it turned out to be one of my best days at Ballymaloe. Ten hours after collecting our two whole pig halves, literally head to tail, we had broken the pig down into spare ribs, chops, ham, pork belly, rashers, several cuts of roasts, loin, 11 kg of sausage and the cheeks which we cold smoked. We had several community dinners through which we barely made a dent to rid our freezers of a year's worth of pork. It remains the most flavorful pork I have ever eaten.
Nonetheless, it was such a brilliant experience that I have since obligated myself to buy a half pig with a friend and butcher it ourselves...all in a domestic kitchen. I'm quite certain that experience will find itself noted on this blog at some point. It also piqued my interest in the various processes of curing meat, specifically pork. Since returning to the States, I decided to become more aware of this process by going to Des Moines, Iowa and working a couple days at La Quercia. They are noted as the premier producers of American Prosciutto, supplying loads of top chefs and restaurants throughout the States.
The owners, Herb and Kathy Eckhouse, were great hosts as they allowed me to work with their staff for two days and learn a bit about curing pork. Obtaining their meat from suppliers who use humane methods, La Quercia follows a seasonal view of taking the pork through the various stages of salting, resting and drying. Albeit on a very basic level, I was able to get involved in several phases to include removing the salt and femur, trimming and washing the salt from the legs, and getting coppa readied for it's resting stage.
It's hard work with a lot of care and concern taken at every step. It's so easy for months of hard work to go pear-shaped with a lack of attention to detail. I certainly came away with a better understanding of the huge effort involved and how delicate a process it really is. For anyone working closely with food, I surely recommend getting stuck in and really finding out about where your food comes from and how it's produced. You can't help but appreciate what it takes to turn out not just decent food, but food that's considered to be the best.
Subscribe to:
Posts (Atom)